The cuicui framework
cuicui is a collection of crates to work with bevy scenes and making UIs in bevy.
This book contains a user-focused guide on how to use the cuicui crates and
more reference-level documentation on what the capabilities of each crate are.
Semantic versioning
All crates in the cuicui framework follow a synchronous release model, similar
to bevy’s. However, the release cadence is independent from bevy’s.
Version matrix
| bevy | latest supporting version |
|---|---|
| 0.12 | 0.12.0 |
| 0.11 | 0.10.2 |
| 0.10 | 0.3.0 |
Stability
cuicui is a playground for experiments, so use at your own risk,
it is likely that a lot of things are going to break each release.
cuicui crates
The crates included in cuicui are:
cuicui_dsl: Thedsl!macro andDslBundle.cuicui_chirp: A parser for files that follow thedsl!syntax. It creates a scene identical to what the same text passed to thedsl!macro would produce.
It also includes a bevy plugin to load.chirpfiles defined in this format.cuicui_layout: The base algorithm and components, does not make any assumption about how it is used, beside the requirement that layout nodes be bevyEntitiyand usesbevy_hierarchy.cuicui_layout_bevy_ui: Integration withbevy_ui, including extension toUiDslforUiImage,Text, background images and background colors.cuicui_layout_bevy_sprite:bevy_spriteintegration, supportsMesh2dHandle,SpriteandText2d. This isn’t as good as thebevy_ui-based integration when it comes to content-driven sizes, but otherwise should work very much like thebevy_uiintegration.
Supporting development
This crate is a single person effort. I don’t get paid for it, and is generally
unsustainable. Please consider donating to make cuicui sustainable.
https://github.com/sponsors/nicopap
Choosing which crates to use
Confused by all the cuicui crates? Understandable, there is a lot of them, with very long names too!
Let’s split the task in two. Ask yourself two questions:
- What do I want to layout?
- How do I want to spawn UI scene?
The following sections tell you which crate to use depending on the answer.
Layouting
All you want is some sort of layouting algorithm that you can keep in your head?
Then use cuicui_layout without any other crates.
- Interested in a ready-made UI library on top of
bevy_ui? Then, usecuicui_layout_bevy_ui. - Want more flexibility? Using
cuicui_layouton top ofbevy_spritewill let you integrate your UI with a lot of 3rd party crates that only work with sprites. Then usecuicui_layout_bevy_sprite. - Using
cuicui_layoutwith your own custom rendering system? Again, barecuicui_layoutis what you want.
Scene syntax
Then you need to decide how to spawn full scenes or UI layouts.
- Using the default bevy syntax, with nested
cmds.insert(…).with_children(…)? No need to add any crate for this :P - Just want something a bit less verbose that the default syntax? Something
very lightweight you can use in your rust code? Don’t mind recompiling the
whole game for each UI touchups? Then use
cuicui_dsl. - Want quick iteration times with hot reloading, an advanced scene file format
with templating, basically an actual scripting language? Ready to
sacrifice some compile time for this? Then use
cuicui_chirp.
The cuicui_dsl page has a comparison matrix with cuicui_chirp to give
you a more detailed idea.
Note that the cuicui_layout_bevy_ui and cuicui_layout_bevy_sprite crates
have the chirp feature enabled by default. If you don’t care for it, then
disable it with default-features = false.
Furthermore, the integration crates depend on cuicui_dsl unconditionally, as
it is a very lightweight dependency.
Now that we chose the cuicui crates we need, time to use them.
For illustration, we assume that we went with cuicui_layout_bevy_ui.
Adding the selected crates
[dependencies]
cuicui_layout_bevy_ui = "0.12.0"
cuicui_layout = "0.12.0"
cuicui_dsl = "0.12.0"
Using the cuicui crates
That’s it! You are now using cuicui_layout, congratulations!
Check the next chapters for actual rust code!
Define a menu using the dsl! macro
We added previously cuicui_dsl, cuicui_layout, and cuicui_layout_bevy_ui
to our Cargo.toml.
Now let’s write some rust code.
We first import the relevant stuff:
use bevy::prelude::*;
use cuicui_dsl::{dsl, EntityCommands};
use cuicui_layout::{dsl_functions::*, LayoutRootCamera};
use cuicui_layout_bevy_ui::UiDsl;
Then, we initialize the bevy app, all standard bevy stuff.
fn main() {
    App::new()
        .add_plugins((
            DefaultPlugins,
            // Notice that we add the plugin here.
            cuicui_layout_bevy_ui::Plugin,
        ))
        .add_systems(Startup, setup)
        .run();
}
Now we want to spawn the UI. Our UI will be a single menu with 7 buttons, each
with a different text. The buttons and menu all have a background, so we need
a Res<AssetServer>.
fn setup(mut cmds: Commands, serv: Res<AssetServer>) {cuicui_layout uses the LayoutRootCamera component to resize layouts based
on the viewport size. So let’s spawn the camera with it:
cmds.spawn((Camera2dBundle::default(), LayoutRootCamera));Now let’s spawn the menu. The methods available on UiDsl are listed on docs.rs.
Documentation
Methods available in the
dsl!macro are the methods available in the choosen DSL type (in this case, it would be theUiDslmethods). Check the documentation page for the corresponding type you are using as DSL. All methods that accept an&mut selfare candidate.
Since UiDsl by default Deref<Target=LayoutDsl>, the methods on LayoutDsl are
also available.
We want:
- A column menu with the
board.pngbackground offset from the left edge of the screen by 100 pixels. - This column contains a large
logo.pngand a smaller one, it also contains 7 buttons. We would want some margin between the edges of the screen and the content of the coulmn, also between the button and the edge of the column.
Let’s first start by setting up the column. We define the handles outside of
the dsl! macor, for clarity:
    let title_card = serv.load("logo.png");
    let bg = serv.load("background.jpg");
    let board = serv.load("board.png");
Then we build the menu. We use the dsl! macro.
- As first parameter we specify the DSL we want to use, here we use
UiDslfromcuicui_layout_bevy_ui, that we imported earlier. - Then, we pass a
&mut EntityCommands, which we create by usingCommands::spawn_empty - Finally, we start the definition of the UI scene.
    dsl! {
        <UiDsl>
        &mut cmds.spawn_empty(),
The first container should have a ScreenRoot component, so that it always has
the same size as the viewport with the LayoutRootCamera component.
In the LayoutDsl,
you add the screen root component by calling the LayoutDsl::screen_root method.
Root(screen_root row distrib_start image(&bg)) {We use row, because the root node is not the column, it is the “screen”,
the container that will hold the column, and we want to position the column
relative to the left side of the screen.
Speaking of which, we use distrib_start, so that the the first object is
placed to the left of the container, the “start” of the distribution zone.
The image(&bg) is the UiDsl::image method, we pass to it the handle to the
"background.jpg" image.
If you have the example code open in your IDE, you should be
able to click on individual methods in the dsl! macro and jump to their source
or see their documentation.
We name the node Root, so that it’s easier to identify it using bevy-inspector-egui.
Let’s see the result:
Root(screen_root row distrib_start image(&bg)) {
    Column(column image(&board))
}
Now let’s add the two logo images to the column.
Root(screen_root row distrib_start image(&bg)) {
    Column(column image(&board)) {
        TitleCard(image(&title_card))
        TitleCard2(image(&title_card))
    }
}
Ooops. Something bad happened here! Interestingly, cuicui_layout printed an
error message. It noticed that the column overflowed its container. The error is:
ERROR bevy_mod_sysfail: Node Root's width is overflowed by its children!
Notes:
- Root's inner size (excluding margins) is 640×360
- There are 1 children of total width 877.5px.
- The largest child is Column
So far, it doesn’t teach us anything that we didn’t know…
Rules
The best way to diagnose this kind of errors is to set rules on the size of the responsible nodes.
Rules in cuicui_layout are size constraints on layout nodes. You can set
rules on width and height independently. In the LayoutDsl DSL, you set
constraints through width, height, or both at the same time with rules.
The size of a container may be:
- Fixed (using
px(pixels)): it is set to a specific number of pixels. - Child-relative (using
child(ratio)): The container size is equal to it’s children’s size on that axis TIMESratioPLUS twice the margin of that axis (more on margins later). - Parent-relative (using
pct(percent)): it is set to a given percent of it’s parent inner size1.
So here, we know that Column is too large for Root. So let’s limit its width to 100 pixels.
We also want the column to span the whole height of the screen, so we will set its
height to pct(100).
Root(screen_root row distrib_start image(&bg)) {
    Column(column width(px(100)) height(pct(100)) image(&board)) {
        TitleCard(image(&title_card))
        TitleCard2(image(&title_card))
    }
}
Let’s see the result:
We now see the whole column, but the logos are still way too large. We get a new error message:
ERROR bevy_mod_sysfail: Node Column's width is overflowed by its children!
Notes:
- Column's inner size (excluding margins) is 100×360
- There are 2 children of total width 585px.
- The largest child is TitleCard2
In the previous error message, the total width of column was 877.55px, in this,
it is 100px, as we expected, but the children’s width is 585px, which is larger than 100
since last time I checked.
As a hint. Before we specified the size of Column, its rules were the default.
The default rule for containers is child(1.5) (585 * 1.5 = ???).
Content size
So our images are why we are overflowing the menu. But why is it so? Well, unlike container nodes, leaf nodes (nodes without children), if they have an image or text, get their size from the image’s or text’s size.
logo.png just so happens to be a 585px by 173px image. Hmm, 585 seems familiar…
Leaf nodes, like container nodes, can have rule constraints, so let’s limit the size of the images:
Root(screen_root row distrib_start image(&bg)) {
    Column(column rules(px(100), pct(100)) image(&board)) {
        TitleCard(width(pct(100)) image(&title_card))
        TitleCard2(width(pct(50)) image(&title_card))
    }
}
We see no errors in the terminal. Still something haunts us. We only defined the width, how comes the height also changed?
It is because, for leaf nodes containing images, if only one axis has a set rule, the other axis will try to keep aspect ratio with the set rule axis, so as not to distort the image.
For example here, for TitleCard, we set the width to 100% of its parent, therefore
100 pixels. So given that the size of logo.png is 585x173, if we set its width
to 100, its height will be 29.6 pixels.
Margin
I find the column to be too much to the left, so let’s add margin between the edge of
the container and the first item on the main axis2 using main_margin:
Root(screen_root row distrib_start main_margin(50.) image(&bg)) {
    Column(column rules(px(100), pct(100)) main_margin(10.) image(&board)) {
// ...
Nice, much better. Note that margin is always symetrical. With main_margin(50.),
we added 50 pixels of margin to the left, but also to the right.
The debug view displays the container margins using a light color. You enable
the debug view by running your app with the --features cuicui_layout/debug flag.
Check this out:
In the screenshot, the Root container outlines the whole screen, with lime lines.
Notice the lighter-colored lime lines at the left and right of the screen, those
are the margins of the Root container. You see that the column is directly aligned
with the start of the inside of the Root.
Is this a victory? Only a small battle is won, the war is still ahead. We have to add our seven buttons.
Code
For the buttons, we will need text. This is a UiDsl method, UiDsl::text.
We also want to use button.png as background for our buttons. We loaded it
using let button_bg = serv.load("button.png").
So let’s proceed:
Root(screen_root row distrib_start main_margin(50.) image(&bg)) {
    Column(column rules(px(100), pct(100)) main_margin(10.) image(&board)) {
        TitleCard(width(pct(100)) image(&title_card))
        TitleCard2(width(pct(50)) image(&title_card))
        Entity(image(&button_bg) width(pct(80)) text("CONTINUE"))
        Entity(image(&button_bg) width(pct(80)) text("NEW GAME"))
        Entity(image(&button_bg) width(pct(80)) text("LOAD GAME"))
        Entity(image(&button_bg) width(pct(80)) text("SETTINGS"))
        Entity(image(&button_bg) width(pct(80)) text("ADDITIONAL CONTENT"))
        Entity(image(&button_bg) width(pct(80)) text("CREDITS"))
        Entity(image(&button_bg) width(pct(80)) text("QUIT GAME"))
    }
}
No errors! But very very ugly. Like wow:
- The column stretches to the whole screen, it makes the layout bottom hevy
- “ADDITIONAL CONTENT” height is twice as large as the other buttons, breaking the harmony.
- The code itself is ugly, we got a lot of repeating code.
Well, on the estethic side, we can’t do much with those assets, but we can set the fixed width of the column to 150 pixels instead of 100.
For code quality, we use an abstraction. Let’s define a function:
fn button(cmds: &mut EntityCommands, button_bg: &Handle<Image>, button_text: &'static str) {
    dsl! {
        <UiDsl> cmds,
        Entity(text(button_text) named(button_text) image(button_bg) width(pct(80)))
    }
}
Don’t try to convert it into a closure! Rust’s type system can’t handle closures that accepts references of different lifetimes, and this will cause a lot of cryptic error messages.
Now, let’s use the the code statement to call that function:
Root(screen_root row distrib_start main_margin(50.) image(&bg)) {
    Column(column rules(px(150), pct(100)) main_margin(10.) image(&board)) {
        TitleCard(width(pct(100)) image(&title_card))
        TitleCard2(width(pct(50)) image(&title_card))
        code(let cmds) { button(cmds, &button_bg, "CONTINUE") }
        code(let cmds) { button(cmds, &button_bg, "NEW GAME") }
        code(let cmds) { button(cmds, &button_bg, "LOAD GAME") }
        code(let cmds) { button(cmds, &button_bg, "SETTINGS") }
        code(let cmds) { button(cmds, &button_bg, "ADDITIONAL CONTENT") }
        code(let cmds) { button(cmds, &button_bg, "CREDITS") }
        code(let cmds) { button(cmds, &button_bg, "QUIT GAME") }
    }
}
Not that much better reallly!
But what are we looking at? code statements allow you to inline rust code
within the dsl! macro.
What if instead we defined the button names in a list and use a for loop inside
the code statement?
    let menu_buttons = [
        "CONTINUE",
        "NEW GAME",
        "LOAD GAME",
        "SETTINGS",
        "ADDITIONAL CONTENT",
        "CREDITS",
        "QUIT GAME",
    ];
Root(screen_root row distrib_start main_margin(50.) image(&bg)) {
Column(column rules(px(150), pct(100)) main_margin(10.) image(&board)) {
TitleCard(width(pct(100)) image(&title_card))
TitleCard2(width(pct(50)) image(&title_card))
code(let cmds) {
for text in menu_buttons {
button(cmds, &button_bg, text)
}
}
}
}
Well, that’s bad. What happened?
If you have the code open in your text editor, look at the type of cmds in let cmds.
Can you guess why this is happening?
You’ll notice it is an &mut EntityCommands. What we are doing in that for loop
is insert over and over our UiDsl on the same entity. This is why we end up with
a single button.
cuicui_dsl passes &mut EntityCommands to code blocks because as a rule, the cuicui DSL
only allows a single entity per statement.
But this doesn’t solve our problem, how would we spawn seven buttons with a
for loop?
The answer is to:
- Spawn a container for the buttons
- Spawn the buttons within that container
                code(let cmds) {
                    dsl! { <UiDsl> cmds,
                        ButtonContainer(column rules(pct(100), pct(60)))
                    };
                    cmds.with_children(|cmds| {
                        for text in menu_buttons {
                            button(&mut cmds.spawn_empty(), &button_bg, text);
                        }
                    });
                }
We got back our seven buttons! The code did end up a bit more complex than the initial repeating code, but if your layout gets complex, this way of abstracting can get handy.
So to finish it up, we still need to add some “empty space” at the bottom of the column and some margin for the logo.
The final result:
    let menu_buttons = [
        "CONTINUE",
        "NEW GAME",
        "LOAD GAME",
        "SETTINGS",
        "ADDITIONAL CONTENT",
        "CREDITS",
        "QUIT GAME",
    ];
    let button_bg = serv.load("button.png");
    let title_card = serv.load("logo.png");
    let bg = serv.load("background.jpg");
    let board = serv.load("board.png");

    dsl! {
        <UiDsl>
        &mut cmds.spawn_empty(),
        Root(screen_root row distrib_start main_margin(50.) image(&bg)) {
            Column(image(&board) rules(px(150), pct(100)) main_margin(10.) column) {
                TitleCard(width(pct(100)) image(&title_card))
                TitleCard2(width(pct(50)) ui(title_card))
                code(let cmds) {
                    dsl! { <UiDsl> cmds,
                        ButtonContainer(column rules(pct(100), pct(60)))
                    };
                    cmds.with_children(|cmds| {
                        for text in menu_buttons {
                            button(&mut cmds.spawn_empty(), &button_bg, text);
                        }
                    });
                }
                BottomSpacer(height(pct(15)))
            }
        }
    };
Woohoo! Time to treat yourself.
Next, we will do this using cuicui_chirp and the chirp language.
The main axis is the axis of direction of the container. For a row
container, the main axis is the x axis. For a column container, it is the
y axis. The cross axis is the axis perpendicular to the corss axis (so
y for row containers and x for column containers)
The “Inner size” is the size of a node deduced its margins on a given axis. It’s the effective size children can occupy, so we use that for percentage.
Define a menu using a chirp file
We will now use cuicui_chirp to define the UI. To do so, we need to add it
as a dependency first:
[dependencies]
# previous dependencies
# ...
# New dependency:
cuicui_chirp = "0.12.0"
The app setup requires adding cuicui_chirp::loader::Plugin::new::<UiDsl>(),
we also setup hot reloading by setting the asset plugin.
    App::new()
        .add_plugins((
            DefaultPlugins.set(AssetPlugin { file_path, ..default() }),
            cuicui_layout_bevy_ui::Plugin,
            // You still need to add manually the asset loader for UiDsl!
            cuicui_chirp::loader::Plugin::new::<UiDsl>(),
        ))
        .add_systems(Startup, setup)
        .run();
Documentation
Methods available in
chirpfiles are the methods available in the choosen DSL type (in this case, it would be theUiDslmethods). Check the documentation page for the corresponding type you are using as DSL. All methods that accept an&mut selfare candidate.
The setup system, where we previously spawned the whole scene, is now
completely trivial, we just spawn a single entity with a ChirpBundle.
fn setup(mut cmds: Commands, serv: Res<AssetServer>) {
    cmds.spawn((Camera2dBundle::default(), LayoutRootCamera));

    cmds.spawn(ChirpBundle::new(serv.load("chirp_menu.chirp")));
}
chirp_menu.chirp is located the assets/ folder.
This chapter assumes you’ve read the previous chapter. We will use it as a base for this.
So where to start? Well, let’s copy/past the code from the simple menu example
into chirp_menu.chirp and see what happens:
Root(screen_root row distrib_start main_margin(50.) image(&bg)) {
    Column(column rules(px(100), pct(100)) main_margin(10.) image(&board)) {
        TitleCard(width(pct(100)) image(&title_card))
        TitleCard2(width(pct(50)) image(&title_card))
        Entity(image(&button_bg) width(pct(80)) text("CONTINUE"))
        Entity(image(&button_bg) width(pct(80)) text("NEW GAME"))
        Entity(image(&button_bg) width(pct(80)) text("LOAD GAME"))
        Entity(image(&button_bg) width(pct(80)) text("SETTINGS"))
        Entity(image(&button_bg) width(pct(80)) text("ADDITIONAL CONTENT"))
        Entity(image(&button_bg) width(pct(80)) text("CREDITS"))
        Entity(image(&button_bg) width(pct(80)) text("QUIT GAME"))
    }
}
Of course this doesn’t work! But here the error format is different. The game
compiles, cuicui_chirp tries to load the file and displays errors it encountered
instead of spawning a scene:
Error:   × Failed to load 'Handle<bevy_render::texture::image::Image>' from file '&button_bg':
  │ No such file or directory (os error 2)
    ╭─[chirp_menu.chirp:10:1]
 10 │         Entity(image(&button_bg) width(pct(80)) text("ADDITIONAL CONTENT"))
 11 │         Entity(image(&button_bg) width(pct(80)) text("CREDITS"))
 12 │         Entity(image(&button_bg) width(pct(80)) text("QUIT GAME"))
    ·                      ──────────
 13 │     }
 14 │ }
    ╰────
  help: The error comes from the ParseDsl implementation.
Error:   × Rule format was not recognized: 'pct(80)', rules end with '%', '*' or 'px'.
  │ Examples: '53%', '0.35*' and '1024px'
    ╭─[chirp_menu.chirp:10:1]
 10 │         Entity(image(&button_bg) width(pct(80)) text("ADDITIONAL CONTENT"))
 11 │         Entity(image(&button_bg) width(pct(80)) text("CREDITS"))
 12 │         Entity(image(&button_bg) width(pct(80)) text("QUIT GAME"))
    ·                                        ───────
 13 │     }
 14 │ }
    ╰────
  help: The error comes from the ParseDsl implementation.
The part of the error message we are the most interested in is the bit of text after Error:
× Failed to load ‘Handle<bevy_render::texture::image::Image>’ from file ‘&button_bg’:
│ No such file or directory (os error 2)
and
× Rule format was not recognized: ‘pct(80)’, rules end with ‘%’, ‘*’ or ‘px’.
│ Examples: ‘53%’, ‘0.35*’ and ‘1024px’
Don’t close the window! Chirp files are hot-reloadable, you can edit the file and see the effect live.
We have two kind of errors here:
- Argument to the
imagemethod. - Argument to
widthandrule.
For (1), methods that accept a Handle<T> in rust accept a string argument
in chirp files. For (2), chirp files use the
FromStr implementation on Rule to parse them, again, as the error message
states.
So let’s replace the variables from the DSL example with the file path and change the syntax on rules:
Root(screen_root row distrib_start main_margin(50) image("background.jpg")) {
    Column(column rules(100px, 100pct) main_margin(10) image("board.png")) {
        TitleCard(width(100pct) image("logo.png"))
        TitleCard2(width(50pct) image("logo.png"))
        Entity(image("button.png") width(80%) text("CONTINUE"))
        Entity(image("button.png") width(80%) text("NEW GAME"))
        Entity(image("button.png") width(80%) text("LOAD GAME"))
        Entity(image("button.png") width(80%) text("SETTINGS"))
        Entity(image("button.png") width(80%) text("ADDITIONAL CONTENT"))
        Entity(image("button.png") width(80%) text("CREDITS"))
        Entity(image("button.png") width(80%) text("QUIT GAME"))
    }
}
Save the file and …
New set of errors, but not as many.
We forgot to convert pct to % in some places. Let’s fix this and save again.

Rules syntax by context
So how to write cuicui_layout rules? Here is a table:
Note that pct, child and px are rust functions
and must be imported.
Templates
This is already good. And it was much faster than before! Didn’t even need to close and re-open the game once!
But, as before, we’d like to make this shorter. To do this, we’ll extract the button
entity into a template definition. In chirp, you define templates at the
beginning of the file with the fn keyword, and you use them like you would use
a rust macro:
// Define a template
fn button() {
    Button(image("button.png") width(80%) text("Button"))
}
Root(screen_root row distrib_start main_margin(50) image("background.jpg")) {
    Column(column rules(150px, 100%) main_margin(10) image("board.png")) {
        TitleCard(width(100%) image("logo.png"))
        TitleCard2(width(50%) image("logo.png"))
        // Call it like a rust macro
        button!()
        button!()
        button!()
        button!()
        button!()
        button!()
        button!()
    }
}
Again, all you need to do is hit the save shortcut in your text editor, and the changes show up directly on screen. (Or errors in the terminal, if any)
Template arguments
Well, we still want to have different names per button. Miracle, templates support parameters. They are like argument to rust functions:
// button_text is a parameter
fn button(button_text) {
    //     'named' allows us to set the entity name dynamically
    //     vvvvv   We can use the template parameter as argument to methods
    //     vvvvv vvvvvvvvvvv                                      vvvvvvvvvvv
    Entity(named(button_text) image("button.png") width(80%) text(button_text))
}
And when calling the template, we pass an argument:
        TitleCard(width(100%) image("logo.png"))
        TitleCard2(width(50%) image("logo.png"))
        // just pass the button name as argument
        button!("CONTINUE")
        button!("NEW GAME")
        button!("LOAD GAME")
        button!("SETTINGS")
        button!("ADDITIONAL CONTENT")
        button!("CREDITS")
        button!("QUIT GAME")
Template parameter substitution rules
Currently, it is not possible to use template parameters everywhere. See limitations.
Template extras
Now we want each button to have a different color. There are seven of them, like
the seven dwarfes, the seven fingers of the hand, and seven colors of the rainbow!
We could add a second parameter to our template, but instead, we’ll use a method extra:
        button!("CONTINUE")(bg(red))
        button!("NEW GAME")(bg(orange))
        button!("LOAD GAME")(bg(yellow))
        button!("SETTINGS")(bg(green))
        button!("ADDITIONAL CONTENT")(bg(cyan))
        button!("CREDITS")(bg(blue))
        button!("QUIT GAME")(bg(violet))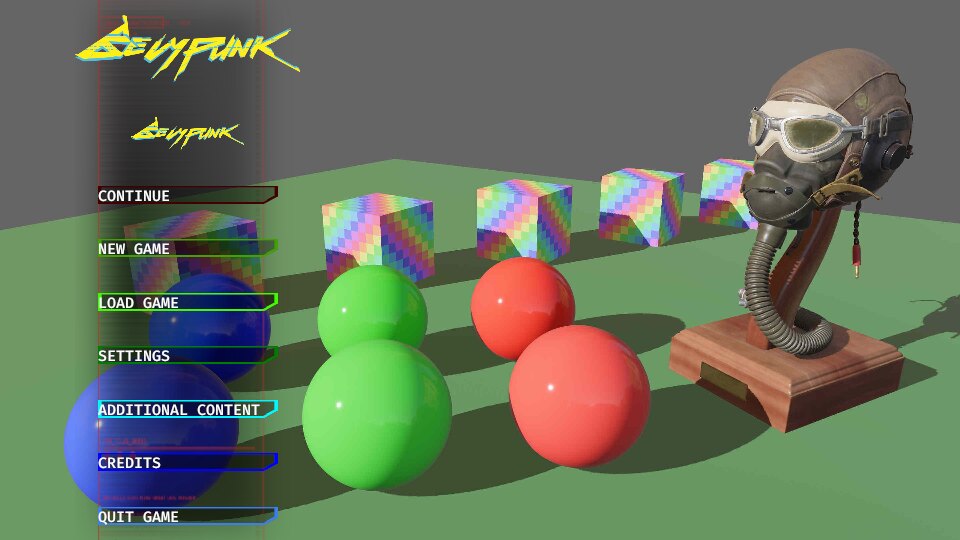
A bit ugly. We should make "button.png" white so that it mixes with the rainbow
colors correctly.
In the chirp file, what happens here is that we are adding the bg(color) method
to the entity spawned by button!. In effect button!("CREDITS")(bg(blue)),
if we expand the template, becomes:
//                                 bg(blue) method is added to the end vvvvvvvv
Entity(named("CREDITS") image("button.png") width(80%) text("CREDITS") bg(blue))
Template extras also work with children nodes, within {}.
And that’s pretty much it when it comes to cuicui_chirp. Next, we will
add a bit of interactivity.
Scaling up with a custom DSL
cuicui_dsl and cuicui_chirp are parametrized over the DslBundle and
ParseDsl traits respectively.
You can directly use one of the DSLs exported by an external crate such as
UiDsl, LayoutDsl, NavigationDsl or SpriteDsl, but we recommend
that you define your own DSL on top of them.
This is how the chirpunk example works. We re-use pre-existing DSLs, but add our own layer on top, to create a unique vocabulary that applies to the specific game we build.
So let’s make a game.
Better Factorio
What better genre than factory-building to illustrate a game UI library? Let’s mix in some grand strategy for good measure. We’ll make Factorio×CrusaderKings fusion.
Our goal is to make:
- A menu with several tabs, tabs are:
- A “game” menu with buttons that represent game menu buttons, clicking on them prints a message
- A “production” menu (with static
pngas graph for now) - A “diplomacy” menu where we can start and end wars, marry someone, launch missiles
We will be able to swap menu by clicking buttons, and most game-specific actions will result in a message being logged into the terminal.
For more complex interaction patterns, read the next chapter.
A menu with tabs
So let’s make a menu.
First, we write the whole menu. To pretend it is a game menu, we draw a
background and then have the menu occupy a subset of the screen. We do that
by setting a 25 pixels margin on the Root entity.
The menu with tabs is a column menu, the first row is the tab line, the second the content:
Root(row screen_root margins(25, 25) image("background.jpg")) {
    Menus(column rules(100%, 100%)) {
Then, we fill up the rest.
The tab line:
        Tabs(row rules(100%, 12.5%) distrib_start) {
            tab!("Game Menu", 0, burlywood)
            tab!("Production Menu", 1, #6b4d22)
            tab!("Diplomacy Menu", 2, #6b4d22)
        }
(more on the tab! template later)
        Menu(layout(">oCaC") rules(100%, 87.5%) marked(Tabs) bg(burlywood)) {
            game_menu!()
            production_menu!()(hidden)
            diplomacy_menu!()(hidden)
        }
The content uses the overlapping layout distribution mode with layout(">oCaC")
(the o is the important bit, it stands for “overlapping”). This allows
each child of Menu to occupy the same space.
We now just have tab, game_menu, production_menu, and diplomacy_menu to
define. (more on those (hidden) later)
Hide the menus
We used template extras here to mark two of the Menu children as “hidden”.
game_menu!()
production_menu!()(hidden)
diplomacy_menu!()(hidden)
Indeed, we don’t want all three menus to be visible at the same time. To this
end, we spawn the production and diplomacy menus with the Visibility component
set to Hidden.
But here is the hang up! Neither LayoutDsl or UiDsl have a hidden method,
how are we to set the Visibility component?
Answer: We write our own DSL.
Let’s start by creating a new module:
mod dsl;Then define a BetterFactorioDsl:
// `DslBundle` requires `Default`
#[derive(Default)]
pub struct BetterFactorioDsl {
    inner: UiDsl,
    is_hidden: bool,
}
Let’s add the chirp loader for BetterFactorioDsl in our add_plugins:
cuicui_chirp::loader::Plugin::new::<BetterFactorioDsl>(),We need to implement ParseDsl and DslBundle on BetterFactorioDsl
for this to compile.
The parse_dsl_impl macro is how we implement ParseDsl.
We use the delegate meta-attribute, so that we can re-use the UiDsl and
LayoutDsl methods in our chirp file:
#[parse_dsl_impl(delegate = inner)]
impl BetterFactorioDsl {}

impl DslBundle for BetterFactorioDsl {
    fn insert(&mut self, cmds: &mut EntityCommands) -> Entity {
        self.inner.insert(cmds)
    }
}
It compiles now, but we are missing the hidden method:
Error:   × No 'hidden' method
    ╭─[better_factorio/menu.chirp:65:1]
 65 │             game_menu!()
 66 │             production_menu!()(hidden)
 67 │             diplomacy_menu!()(hidden)
    ·                               ^^^^^^
 68 │         }
    ╰────
  help: custom_dsl::dsl::BetterFactorioDsl doesn't contain a method with this name.
Let’s add it then! We already have a is_hidden field, we just have to
define a hidden method to set it:
impl BetterFactorioDsl {
    fn hidden(&mut self) {
        self.is_hidden = true;
    }
Now we can read the is_hidden field in the DslBundle::insert implementation:
        self.inner.insert(cmds);
        if self.is_hidden {
            cmds.insert(Visibility::Hidden);
        }
Make sure to add it after the inner.insert(cmds). Visibility is part of the
NodeBundle that UiDsl adds to the entity. Adding it after the inner ensures
that we overwrite the Visibility component with the wanted value.
Game menu & interaction
Ok, so I included the game menu in all those screenshots, but didn’t define it yet. Sorry for the confusion.
The game menu was a template call, game_menu!(). Then, let’s define it.
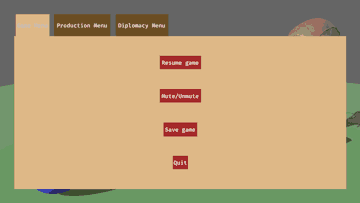
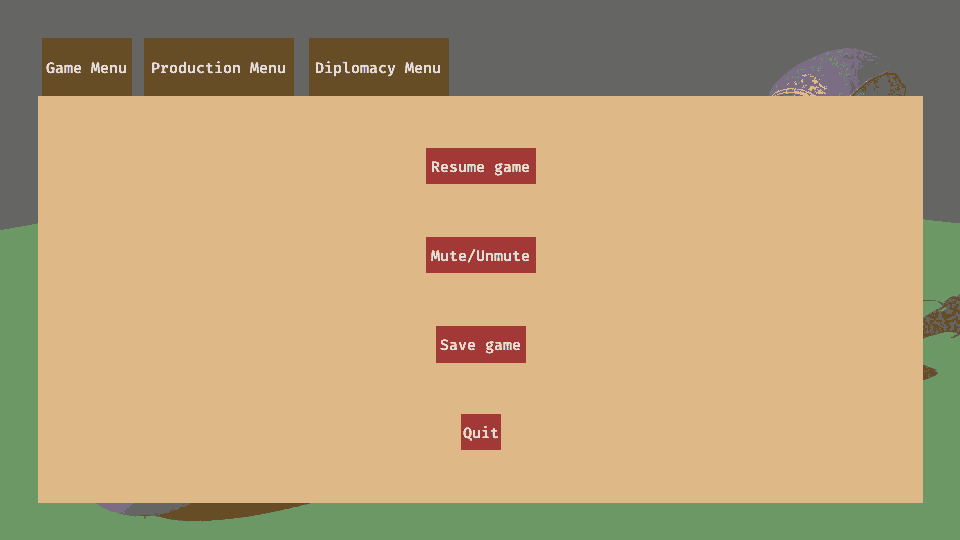
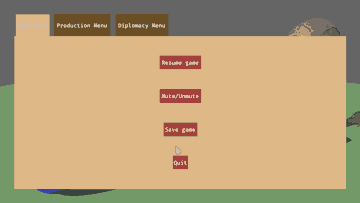
fn game_menu() {
    GameMenu(column rules(100%, 100%)) {
        Entity(height(0%))
        print_button!("Resume game")
        print_button!("Mute/Unmute")
        print_button!("Save game")
        print_button!("Quit")
        Entity(height(0%))
    }
}
print_button! is yet another template. It stands for a button we can click,
when clicking it, a message is displayed in the console.
fn print_button(button_text) {
    Entity(print_text(button_text) highlight row rules(1.1*, 2*) named(button_text) bg(brown)) {
        ButtonText(text(button_text))
    }
}
Notice that we called the print_text(button_text) and highlight methods in
print_button!.
highlightshould add a component that changes the color of the button when it’s being hoveredprint_textdoes print in the console the button text content.
Let’s add them to our BetterFactorioDsl.
Using bevy_mod_picking
We will use the bevy_mod_picking components for this.
We should use the On component from bevy_mod_picking. One issue with On
is that it is not Reflect, therefore, we cannot use it in our chirp file;
cuicui_chirp creates a scene then adds it to the bevy world, and this requires
all components from the scene to be Reflect.
cuicui_dsldoesn’t have this issue.
We can get around this limitation by creating a “mirror” component. Mirror
components are Reflect proxies that are synchronized with actual components.
We already define a MirrorPlugin in the cuicui_examples shared code.
I plan on extracting this into a standalone crate,
cuicui_mirror.
All we have left to do is to define a mirror component,
implement From<&ReflectOnClick> for On<Pointer<Click>>, and add MirrorPlugin.
use bevy::log::info;
use bevy::prelude::{Component, EventWriter, Reflect, ReflectComponent};
use bevy_mod_picking::prelude::{Click, On, Pointer};

use crate::dsl::{SwitchGraph, SwitchTab};

#[derive(Reflect, Default, Component)]
#[reflect(Component)]
pub enum ReflectOnClick {
    LogInfo(String),
    EmitSwitchTab(u8),
    EmitSwitchGraph(u8),
    #[default]
    Invalid,
}
type OnClick = On<Pointer<Click>>;

impl<'a> From<&'a ReflectOnClick> for OnClick {
    fn from(value: &'a ReflectOnClick) -> Self {
        match value {
            ReflectOnClick::LogInfo(text) => {
                let text = text.clone();
                Self::run(move || info!("{text}"))
            }
            &ReflectOnClick::EmitSwitchTab(index) => {
                Self::run(move |mut ev: EventWriter<_>| ev.send(SwitchTab(index)))
            }
            &ReflectOnClick::EmitSwitchGraph(index) => {
                Self::run(move |mut ev: EventWriter<_>| ev.send(SwitchGraph(index)))
            }
            ReflectOnClick::Invalid => unreachable!("Should never spawn an invalid ReflectOnClick"),
        }
    }
}
bevy_mod_picking::DefaultPickingPlugins,
cuicui_examples::MirrorPlugin::<OnClick, ReflectOnClick>::new_from(),Now let’s amend BetterFactorioDsl to add the highlight and print_text methods:
#[derive(Default)]
pub struct BetterFactorioDsl {
    inner: UiDsl,
    is_hidden: bool,
+   is_highlight: bool,
+   text_to_print: Option<Box<str>>,
}
In the #[parse_dsl_impl] impl BetterFactorioDsl block:
    fn print_text(&mut self, text: &str) {
        self.text_to_print = Some(text.into());
    }
    fn highlight(&mut self) {
        self.is_highlight = true;
    }
In DslBundle::insert for BetterFactorioDsl:
        if let Some(text) = self.text_to_print.take() {
            cmds.insert(ReflectOnClick::LogInfo(text.into()));
        }
        if self.is_highlight {
            cmds.insert(Highlight::new(Color::BEIGE));
        }
I’ll skip over Highlight here, you can see the implementation for yourself.
Similarly to ReflectOnClick, we use bevy_mod_picking to react to events, but
define it as a standalone Reflect component to be able to use it in a scene.
(not shown: the logs in the terminal)
The tab line
Now that only a single menu shows up at a time, we should have the ability to switch between them.
We should be able to click on a tab to swap between menu.
Let’s define our tab! template.
- We’ll use a darker tone color for unselected tabs,
#6b4d22. - We’ll give some space between each tab, to reproduce real world tabs (skeuomorphic design 🤓).
fn tab(menu_name) {
    Entity(row rules(1.1*, 100%) named(menu_name)) {
        TabSurface(highlight row rules(1.1*, 100%) bg(#6b4d22)) {
            TabText(text(menu_name))
        }
    }
}
// ...
Tabs(row rules(100%, 12.5%) distrib_start) {
    tab!("Game Menu")
    tab!("Production Menu")
    tab!("Diplomacy Menu")
}
It’s nice and all, but we need some interactivity. We also need the selected tab to have the same color as the game menu background.
We can’t use template extras in this case, because the root node of the tab
template is transparent, we need to pass the color as an additional argument
-fn tab(menu_name) {
+fn tab(menu_name, initial_color) {
    Entity(row rules(1.1*, 100%) named(menu_name)) {
-       TabSurface(highlight row rules(1.1*, 100%) bg(#6b4d22)) {
+       TabSurface(highlight row rules(1.1*, 100%) bg(initial_color)) {
            TabText(text(menu_name))
        }
Tabs(row rules(100%, 12.5%) distrib_start) {
-   tab!("Game Menu")
-   tab!("Production Menu")
-   tab!("Diplomacy Menu")
+   tab!("Game Menu", burlywood)
+   tab!("Production Menu", #6b4d22)
+   tab!("Diplomacy Menu", #6b4d22)
Switching between tabs
Unlike the print_text buttons, here, we need to change which menu is visible
when the tab is pressed. So let’s create a new method: switch_tab and add it
to our template:
    Entity(row rules(1.1*, 100%) named(menu_name)) {
-       TabSurface(highlight row rules(1.1*, 100%) bg(#6b4d22)) {
+       TabSurface(highlight switch_tab(menu_index) row rules(1.1*, 100%) bg(initial_color)) {
            TabText(text(menu_name))
        }
Similarly to Highlight, I won’t expand on switch_tab. The
idea is to:
- Have a
TabButton(u8)component. Whenever an entity with this component is clicked, send aSwitchTabevent with theu8. - Mark the parent of all the three menus with a component,
Tabs. - Whenever we receive a
SwitchTab(u8)component, query for theTabsentity and its children, setVisibilityof all the children but theu8toVisibility::Hidden.
    use Visibility::{Hidden, Inherited};

    for req in tab_requests.read() {
        let Ok(menu_children) = tab_menu.get_single() else {
            continue;
        };
        let mut i = 0;
        let mut iter = vis.iter_many_mut(menu_children);
        while let Some(mut vis) = iter.fetch_next() {
            *vis = if i == req.index() { Inherited } else { Hidden };
            i += 1;
        }
    }
See the implementation for details.
We need to use bevy_mod_picking for this as well, and this requires using a
mirror component. Conveniently, we already did it in a previous section.
#[derive(Default)]
pub struct BetterFactorioDsl {
    inner: UiDsl,
    is_hidden: bool,
    is_highlight: bool,
    text_to_print: Option<Box<str>>,
+   switch_tab: Option<u8>,
}
In the #[parse_dsl_impl] impl BetterFactorioDsl block:
    fn switch_tab(&mut self, index: u8) {
        self.switch_tab = Some(index);
    }
In DslBundle::insert for BetterFactorioDsl:
        if let Some(index) = self.switch_tab {
            cmds.insert((ReflectOnClick::EmitSwitchTab(index), TabButton(index)));
        }
Finally, we need to pass the menu index as parameter to the template:
fn tab(menu_name, menu_index, color) {
    Entity(row rules(1.1*, 100%) named(menu_name)) {
        TabSurface(highlight switch_tab(menu_index) row rules(1.1*, 100%) bg(color)) {
            TabText(text(menu_name))
        }
    }
}
Tabs(row rules(100%, 12.5%) distrib_start) {
tab!("Game Menu", 0, burlywood)
tab!("Production Menu", 1, #6b4d22)
tab!("Diplomacy Menu", 2, #6b4d22)
}
Diplomacy and Production
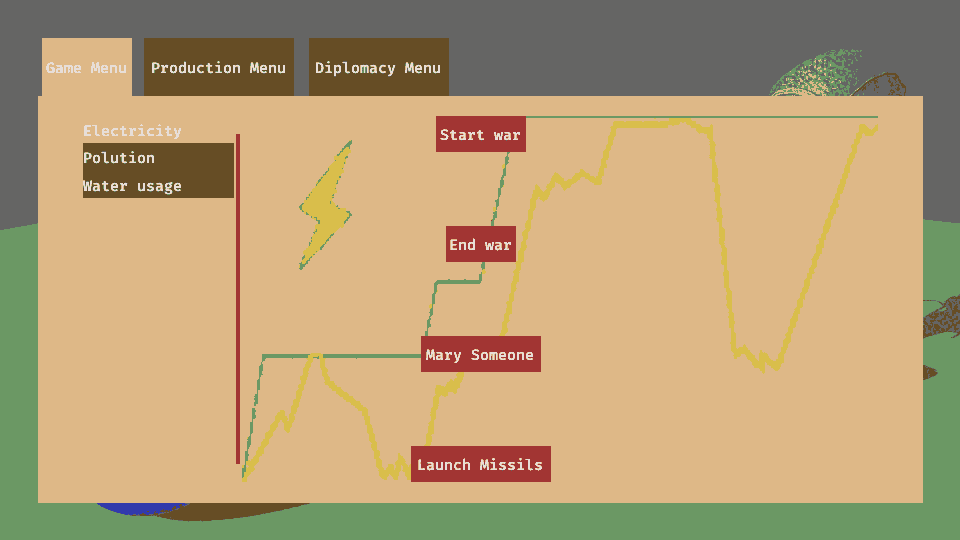
The diplomacy menu is very similar to the game menu, I won’t go over it, just get a look at the code:
fn diplomacy_menu() {
    DiplomacyMenu(column rules(100%, 90%)) {
        print_button!("Start war")
        print_button!("End war")
        print_button!("Marry Someone")
        print_button!("Launch Missiles")
    }
}
The production menu is more interesting. Similarly to the root menu, we want several panels (production types: electricity, water, pollution) we can switch between, and buttons to select the panel.
We will use the same switch implementation that we used for tabs.
This time, we will name our method switch_graph. I won’t go over the rust
implementation, as it’s pretty much a copy/paste of the tabs switching code.
fn production_button(button_text) {
    Entity(layout(">dSaC") named(button_text) rules(100%, 1.5*) bg(#6b4d22) highlight) {
        Entity(text(button_text))
    }
}
fn production_menu() {
    ProductionMenu(row rules(100%, 90%) main_margin(30)) {
        TypesColumn(layout("vdSaS") rules(19%, 100%)) {
            production_button!(Electricity)(switch_graph(0) bg(burlywood))
            production_button!(Water usage)(switch_graph(1))
            production_button!(Polution)(switch_graph(2))
        }
        Entity(rules(0.5%, 90%) bg(brown))
        TypesGraph(layout(">oCaC") rules(80%, 100%) marked(Graphs)) {
            Electricity(image("better_factorio/elect_graph.png") width(100%))
            WaterUsage(image("better_factorio/water_graph.png") hidden width(100%))
            Polution(image("better_factorio/pollution_graph.png") hidden height(100%))
        }
    }
}
Running examples
Use the cargo run --bin command to list possible examples, and run them.
We do this because it allows us to have different dependencies between examples.
Specific example docs
hello_world
The most minimal code to show usage of cuicui_layout using cuicui_dsl
simple_menu
A single menu made using cuicui_dsl.
chirp_menu
A single menu supporting hot reloading made using cuicui_chirp.
cuicui_examples
Library of plugins useful for the more advanced examples.
SwitchPlugin: An event-driven toggle between N children of an entityMirrorPlugin: A way to syncReflectcomponents with non-Reflect3rd party components.HighlightPlugin:bevy_mod_picking-based hover highlight that tries to be smart about color changes.
custom_dsl
A tabed menu with three different screens
chirpunk
A clone of the cyberpunk 2077 main menu and settings menu.
Demonstrates full end-to-end usage of .chirp, including common patterns for
managining complexity.
This example requires additional steps to work properly.
Check the example’s README for more details.
dsl_and_chirp
Demonstrates the equivalence between the dsl! macro and the .chirp file
format. Also used as a test to make sure it is trully equivalent.
sprite_debug
Demonstrates usage of cuicui_layout_bevy_sprite. Due to a quirk in the way
cargo resolves workspace features, the debug overlay is specifically broken for
this. You need to use the following command line to run it with the layout debug
overlay:
cargo run --bin sprite_debug -p sprite_debug --features cuicui_layout/debug
templates
demonstrates usage of the cuicui_chirp templating features. See the file in
assts/templates.chirp for details, as most of the interesting code is in the
chirp file itself, not the rust source code.
Chirpunk
The cuicui cyberpunk example.
Inspired by bevy-lunex’s cyberpunk example.
This demonstrates how to create and handle a more complex menu. It has:
- Several screens (title screen, graphics settings, audio settings, bonus tabs)
- Buttons with juicy hover animations
- Nice screen effects such as background animation and bloom
- Gamepad handling with
bevy-ui-navigation - Minimal data binding based on events.
Building
Due to the nature of the assets used, I prefer not including them in this
repository. To get them, run the make checkout-cyberpunk make recipe.
The idea is to clone the bevy-lunex cyberpunk example and re-use its asset
directory.
If make is not an option for you, the following shell commands should work,
although it has only been proven to work on my machine™.
# First Make sure that your working directory (PWD) is the cuicui_layout workspace root.
if not test -e CHANGELOG.md ; then
  echo "your working directory (PWD) should be the cuicui_layout workspace root."
  exit 1
fi

# Create a repository for bevy-lunex-cyberpunk, without copying the files
git clone --no-checkout --depth=1 --filter=tree:0 \
    https://github.com/IDEDARY/bevy-lunex-cyberpunk.git \
    examples/chirpunk/lunex-cyberpunk-assets
# Go into bevy-lunex-cyberpunk repo and tell it to only download the 'assets' directory
cd examples/chirpunk/lunex-cyberpunk-assets
git sparse-checkout set --no-cone assets
# Check out the bevy-lunex-cyberpunk files
git checkout

# Setup the 'assets' directory in ./examples/chirpunk
cd ..
../../scripts/x_platform_ln.sh lunex-cyberpunk-assets/assets assets
cd lunex-cyberpunk-assets/assets
# add 'menus' files to the assets directory
../../../../scripts/x_platform_ln.sh ../../menus menus
cd ../../../..
Running
cargo run --bin chirpunk --features cuicui_layout/debug(the feature flag is optional)
Use --no-default-features to not spawn the bevy-inspector-egui world inspector.
And use --features advanced_logging to log more stuff.
Limitations
- Uses
bevy_ui(throughcuicui_layout_bevy_ui):- Bloom doesn’t work on UI
- Requires a patched version of bevy for hot reloading to work (see the
repository’s workspace
Cargo.toml)
- General 3rd party crate ideas:
- Extract and generalize the
style.rsmodule, which is really cool.
- Extract and generalize the
- When using mouse input, the current tab in the settings menu is not highlighted.
- The “BACK” button is part of the tabs menu
The end-goal is to use cuicui_layout_bevy_sprite instead of
cuicui_layout_bevy_ui as “rendering backend”. As we don’t need bevy_ui for
this specific example (the only benefit of bevy_ui over bevy_sprite is
layouting, click management and borders, of which we use none), and bevy’ sprite
renderer is more flexible.
But I wanted to start with a working example, and cuicui_layout_bevy_sprite
still is missing some basic features to make it useable.
In the future, we will add a new bin target, that re-uses most of the code but
uses the dsl! macro instead of chirp files.
Architecture
Since this is a complex example, it needs a bit of a “map” so that you can orient yourself and find the landmarks that is most relevant to you.
We have five modules:
dsl: The most important module. A wrapper aroundUiDslto add to the DSL a vocabulary specific to our own UI, such as “main_menu_item” or “tab_button”. The “method names” you see used in the.chirpfiles anddsl!macros are methods onBevypunkDsl, andUiDsl, andLayoutDslandBaseDsl.
Those are methods you can call using regular rust method syntax!animate: Animation components, used for the shift-on-hover & background police car strobe lights in the title screencolormix: definescolor_lerpto blend bevyColors in HSLuv space, used inanimateui_offset: Simple plugin to apply object movement AFTERbevy_ui’s layouting system. Used inanimatefor the shift-on-hover effect.style: A styling module. It’s a way to change styling variable at runtime throuhg thestyle::Bevypunkresource. This could also be loaded as a resource or modified throughbevy-inspector-egui.
The .chirp files defining the menus are in the menus directory.
cuicui_dsl
![]()
cuicui_dsl is a crate exposing a single trait (DslBundle) and
a single macro (dsl!) to define bevy scenes within rust code.
It is used in cuicui for UI, but can be used for any kind of scene.
When to use cuicui_dsl?
- You want an extremely lightweight yet powerful scene definition DSL in bevy
to replace the innane
cmds.spawn(…).insert(…).with_children(…)dance. - You don’t care about having to re-compile the whole game each time you change your scene.
How to use cuicui_dsl?
- Define a type that implements
DslBundle - Define methods with a
&mut selfreceiver on this type - Use the methods of the type in question in the
dsl!macro
#![allow(unused)]
fn main() {
use cuicui_dsl::macros::__doc_helpers::*; // ignore this line pls
use std::borrow::Cow;
use cuicui_dsl::{dsl, DslBundle, EntityCommands};

// DslBundle requires Default impl
#[derive(Default)]
pub struct MyDsl {
    style: Style,
    bg_color: Color,
    font_size: f32,
    inner: BaseDsl,
}
impl MyDsl {
    pub fn named(&mut self, name: impl Into<Cow<'static, str>>) {
        self.inner.named(name);
    }
    pub fn style(&mut self, style: Style) {
        self.style = style;
    }
    pub fn bg_color(&mut self, bg_color: Color) {
        self.bg_color = bg_color;
    }
    pub fn font_size(&mut self, font_size: f32) {
        self.font_size = font_size;
    }
}
impl DslBundle for MyDsl {
    fn insert(&mut self, cmds: &mut EntityCommands) {
        cmds.insert(self.style.clone());
        cmds.insert(BackgroundColor(self.bg_color));
        self.inner.insert(cmds);
        // ...
    }
}
// Now you can use `MyDsl` in a `dsl!` macro
fn setup(mut cmds: Commands) {
    let height = px(32);
    dsl! {
        <MyDsl>
        &mut cmds.spawn_empty(),
        // The uppercase name at the start of a statement is the entity name.
        Root(style(Style { flex_direction: FlexDirection::Column, ..default()}) bg_color(Color::WHITE)) {
            Menu(style(Style { height, ..default()}) bg_color(Color::RED))
            Menu(style(Style { height, ..default()}) bg_color(Color::GREEN))
            Menu(style(Style { height, ..default()}) bg_color(Color::BLUE))
        }
    };
}
}
Documentation
Methods available in the
dsl!macro are the methods available in the choosen DSL type (in this case, it would be theMyDslmethods). Check the documentation page for the corresponding type you are using as DSL. All methods that accept an&mut selfare candidate.
This seems a bit verbose, that’s because you should be using cuicui_layout and
not bevy’s native layouting algorithm (flexbox) for layouting :)
The docs.rs page already has extensive documentation on the dsl! macro,
with a lot of examples.
The short of it is:
dsl! accepts three arguments:
- (optional) the
DslBundletype you want to use as “builder” for the DSL. - The
&mut EntityCommandsto spawn the scene into. - A single statement
What is a statement? A statement is:
- An
EntityName(which is a single identifier) followed by either:- several methods within
(parenthesis) - several children statements within
{curly braces} - both of the above
- several methods within
A statement creates a Default::default() of the choosen DslBundle type.
Then, each mehtod within parenthesis is called on the choosen DslBundle type.
Finally, an entity is spawned using the DslBundle::insert method on the
thus-constructed DslBundle.
The spawned entity has the Name component set to the identifier provided for EntityName.
Children are added to that entity if child statements are specified within braces.
Still confused about it? I encourage you to either look at the examples or check the docs at:
DSL-specific documentation
Since dsl! is just a wrapper around method calls, you can refer to the docs.rs
page for the DslBundle implementation you chose to use in your dsl!.
Tips and tricks
Behind the veil
The dsl! macro is basically a way to translate an imperative sequential API
into a declarative functional API.
When you write:
#![allow(unused)]
fn main() {
use cuicui_dsl::macros::__doc_helpers::*; // ignore this line pls
use cuicui_dsl::dsl;
fn sys(mut cmds: EntityCommands) {
dsl! {
    <BlinkDsl>
    &mut cmds,
    Root {
        FastBlinker(frequency(0.5))
        SlowBlinker(amplitude(2.) frequency(3.0))
    }
}
}
}
The dsl! macro translates it into:
#![allow(unused)]
fn main() {
use cuicui_dsl::macros::__doc_helpers::*; // ignore this line pls
fn sys(mut cmds: EntityCommands) {
let mut root = BlinkDsl::default();
root.named("Root");
root.node(&mut cmds, |cmds| {
    let mut fast_blinker = BlinkDsl::default();
    fast_blinker.named("FastBlinker");
    fast_blinker.frequency(0.5);
    fast_blinker.insert(&mut cmds.spawn_empty());

    let mut slow_blinker = BlinkDsl::default();
    slow_blinker.named("SlowBlinker");
    slow_blinker.amplitude(2.);
    slow_blinker.frequency(3.0);
    slow_blinker.insert(&mut cmds.spawn_empty());
});
}
}
The DslBundle::insert impl of BlinkDsl takes care of converting itself
into a set of components it will insert on an entity.
See the dsl! documentation for more details and examples.
Inheritance
The cuicui crates compose different DslBundles with a very filthy trick.
Using DerefMut, you can get both the methods of your custom DslBundle and
the methods of another DslBundle embedded into your custom DslBundle
(and this works recursively).
Use the bevy Deref and DerefMut derive macros to accomplish this:
#![allow(unused)]
fn main() {
use cuicui_dsl::macros::__doc_helpers::*; // ignore this line pls
use cuicui_dsl::DslBundle;

// `= ()` means that if not specified, there is no inner DslBundle
#[derive(Default, Deref, DerefMut)]
pub struct MyDsl<D = ()> {
    #[deref]
    inner: D,
    style: Style,
    bg_color: Color,
    font_size: f32,
}
impl<D: DslBundle> DslBundle for MyDsl<D> {
    fn insert(&mut self, cmds: &mut EntityCommands) {
        cmds.insert(self.style.clone());
        // ... other components to insert ...
        // Always call the inner type at the end so that insertion order follows
        // the type declaration order.
        self.inner.insert(cmds);
    }
}
// Both the methods defined on `MyDsl`
// and the provided `D` are available in the `dsl!` macro for `<MyDsl<D>>`
}
Performance
The downside of the aforementioned trick is the size of your DslBundles.
Very large DslBundles tend to generate a lot of machine code just to move them
in and out of functions.
Try keeping the size of your DslBundles down using bitsets crates such as
enumset or bitflags instead of bool fields.
Consider also Boxing some large components such as Style to avoid the cost of
moving them.
Storing a dynamic set of bundles in your DslBundle
If you are a lazy butt like me, you don’t need to add a field per bundles/component
managed by your DslBundle, you can store a Vec of bundle spawners as follow:
#![allow(unused)]
fn main() {
use cuicui_dsl::macros::__doc_helpers::*; // ignore this line pls
use cuicui_dsl::{EntityCommands, DslBundle};

#[derive(Default)]
pub struct MyDynamicDsl(Vec<Box<dyn FnOnce(&mut EntityCommands)>>);

impl MyDynamicDsl {
    pub fn named(&mut self, name: &str) {
        let name = name.to_string();
        self.0.push(Box::new(move |cmds| {cmds.insert(Name::new(name));}));
    }
    pub fn transform(&mut self, transform: Transform) {
        self.0.push(Box::new(move |cmds| {cmds.insert(transform);}));
    }
    pub fn style(&mut self, style: Style) {
        self.0.push(Box::new(move |cmds| {cmds.insert(style);}));
    }
    // ... Hopefully you get the idea ...
}
impl DslBundle for MyDynamicDsl {
    fn insert(&mut self, cmds: &mut EntityCommands) {
        for spawn in self.0.drain(..) {
            spawn(cmds);
        }
    }
}
}
What is the relationship between cuicui_dsl and cuicui_chirp?
cuicui_dsl is a macro (dsl!), while cuicui_chirp is a scene file format,
parser and bevy loader. cuicui_chirp builds on top of cuicui_dsl, and has
different features than cuicui_dsl. Here is a feature matrix:
| features | cuicui_dsl | cuicui_chirp |
|---|---|---|
| statements & methods | ✅ | ✅ |
code blocks with in-line rust code | ✅ | |
code calling registered functions | ✅ | |
fn templates | rust1 | ✅ |
| import from other files | rust2 | |
| hot-reloading | ✅ | |
| reflection-based methods | ✅ | |
| special syntax for colors, rules | ✅ | |
| lightweight | ✅ | |
Allows for non-Reflect components | ✅ |
You may use cuicui_dsl in combination with cuicui_chirp, both crates fill
different niches.
A fn template is equivalent to defining a function that accepts an
EntityCommands and directly calls dsl! with it
#![allow(unused)]
fn main() {
use cuicui_dsl::macros::__doc_helpers::*; // ignore this line pls
use cuicui_dsl::{dsl, EntityCommands};

fn rust_template(cmds: &mut EntityCommands, serv: &AssetServer) {
  dsl! {
    cmds,
    Root(screen_root column) {
      Menu(image(&serv.load("menu1.png")))
      Menu(image(&serv.load("menu2.png")))
    }
  }
}
}
You can — of course — import functions from other files in rust and use that instead.
cuicui_chirp
![]()
cuicui_chirp defines a file format for text-based bevy scene description.
It is used in cuicui for UI, but can describe any kind of scene.
It includes:
- A parser for the file format.
- A bevy loader to load those files in bevy, with
loader::Plugin. - A trait (
ParseDsl) to use your own type’s methods as chirp methods - A macro to automatically implement this trait (
parse_dsl_impl)
The syntax is very close to that of cuicui_dsl’s dsl! macro,
with some additions.
When to use cuicui_chirp?
- You want a powerful and extensible scene definition format for bevy
to replace the innane
cmds.spawn(…).insert(…).with_children(…)dance. - You want quick iteration time using hot reloading and useful error messages.
- You want to minimize the amount of rust code you write to manage scenes.
- You want a re-usable scene definition format.
Be aware that cuicui_chirp, by its nature, is not a small dependency.
Consider using cuicui_dsl if dependency size matters to you.
Also, as of 0.10, cuicui_chirp doesn’t support WASM for image and font assets.
How to use cuicui_chirp?
Cargo features
fancy_errors(default): Print parsing error messages in a nicely formatted way.macros(default): Define and export theparse_dsl_implmacroload_font(default): loadHandle<Font>as method argumentload_image(default): loadHandle<Image>as method argumentmore_unsafe: Convert some runtime checks into unsafe assumptions. In theory, this is sound, butcuicui_chirpis not tested enough to my taste for making those assumptions by default.
Usage
cuicui_chirp reads files ending with the .chirp extension. To load a .chirp
file, use ChirpBundle as follow:
#[cfg(feature = "doc_and_test")] mod test {
use cuicui_chirp::__doc_helpers::*; // ignore this line pls
use bevy::prelude::*;
use cuicui_chirp::ChirpBundle;

fn setup(mut cmds: Commands, assets: Res<AssetServer>) {
    cmds.spawn((Camera2dBundle::default(), LayoutRootCamera));
    cmds.spawn(ChirpBundle::from(assets.load("my_scene.chirp")));
}
}
You need however to add the loader pluging (loader::Plugin) for this to work.
The plugin is parametrized over the DSL type.
The DSL type needs to implement the ParseDsl trait.
Here is an example using cuicui_layout_bevy_ui’s DSL:
#[cfg(feature = "doc_and_test")] mod test {
use cuicui_chirp::__doc_helpers::*; // ignore this line pls
fn setup() {}
use bevy::prelude::*;
use cuicui_layout_bevy_ui::UiDsl;

fn main() {
    App::new()
      .add_plugins((
        DefaultPlugins,
        cuicui_chirp::loader::Plugin::new::<UiDsl>(),
      ))
      .add_systems(Startup, setup)
      .run();
}
}
Documentation
Methods available in
chirpfiles are the methods available in the choosen DSL type (in this case, it would be theUiDslmethods). Check the documentation page for the corresponding type you are using as DSL. All methods that accept an&mut selfare candidate.
DSL-specific documentation
The identifiers within parenthesis are methods on the ParseDsl.
Since the chirp format is a wrapper over a ParseDsl, refer to the methods
on the ParseDsl impl you added as loader::Plugin.
Making a DslBundle compatible with cuicui_chirp
Let’s re-use the example in cuicui_dsl and extend it to work with cuicui_chirp.
We had a MyDsl that implements DslBundle, now we need to also implement ParseDsl
for it. So that methods are accessible in ParseDsl, use the parse_dsl_impl
attribute macro, and add it to the impl block where all the DSL’s methods are
defined:
     font_size: f32,
 }
+#[cuicui_chirp::parse_dsl_impl]
 impl MyDsl {
     pub fn style(&mut self, style: Style) {
         self.style = style;
Yep, for the simple case that’s it. Just avoid panicking inside methods if you want to take advantage of hot reloading.
.chirp file format
The basic syntax is similar to the cuicui_dsl dsl! macro.
One major difference is that code blocks are replaced with a function registry.
You can register a function using the WorldHandles resource. Registered
functions are global to all chirp files loaded using cuicui_chirp.
The other differences are the addition of import statements (use),
template definitions (fn), and template calls (template!()).
Import statements
They are currently not implemented, so please proceed to the next section.
Draft design
Note Imports ARE NOT IMPLEMENTED
In cuicui_chirp you are not limited to a single file. You can import other
chirp files.
To do so, use an import statement. Import statements are the first statements
in the file; They start with the use keyword, are followed by the source
path of the file to import and an optional “as imported_name”, this is the
name with which the import will be refered in this file.
use different/file
// ...
You have two ways to use imports:
- As whole file imports. You can import any file and directly use it as if it was a template without parameters. This is useful if you want to compose several complex menus you write in different files.
- As template collections. You can import individual templates defined in
a file. Just complete the path with a
.template_name.
Similarly to rust, you can combine imports, but only templates from the same file, so the following is valid:
use different/file.template
use different/file.{template1, template2}
// ...
Wild card imports are not supported.
Publicity
However, to be able to import templates, you need to mark them as pub in the
source template. Just prefix the fn with pub and that’s it.
Template definitions
chirp files admit a series of fn definitions at the very beginning of the
file. A fn definition looks very similar to rust function definitions.
It has a name and zero or several parameters. Their body is a single statement:
// file: <scene.chirp>
// template name
//   ↓
// vvvvvv
fn spacer() {
	Spacer(height(10px) width(10%) bg(coral))
}
//             parameter
// template name  ↓
//    ↓           ↓
// vvvvvv vvvvvvvvvvv
fn button(button_text) {
    Entity(named(button_text) width(95%) height(200px) bg(purple) row) {
        ButtonText(text(button_text) rules(0.5*, 0.5*))
    }
}
You can call a template like you would call a rust macro, by writing the template
name followed by ! and parenthesis:
fn sys(cmds: &mut cuicui_dsl::EntityCommands) { cuicui_dsl::dsl!(cmds,
// file: <scene.chirp> (following)
Menu(screen_root row bg(darkgrey)) {
    TestSpacer(width(30%) height(100px) bg(pink))
    spacer!()
    button!("Hello world")
}
)}
When a template is called, it will be replaced by the single root statement
defined as body of the fn definition for that template.
Template Extras
Template calls can be followed by template extras.
fn sys(cmds: &mut cuicui_dsl::EntityCommands) { cuicui_dsl::dsl!(cmds,
// file: <scene.chirp> (following)
Menu(screen_root row bg(darkgrey)) {
    TestSpacer(width(30%) height(100px) bg(pink))

    // Additional method list after the template arguments list
    //       vvvvvvvvvvvvvvvvvvvvvv
    spacer!()(width(50%) bg(coral))

    // Both additional methods and additional children added after the argument list
    //                    vvvvvvvvvv
    button!("Hello world")(column) {
        MoreChildren(text("Hello"))
        MoreChildren(text("World"))
    }
}
)}
The additional methods will be added at the end of template’s root statement method list. While the additional children statements will be added as children of the template’s root statement.
Take for example this chirp file:
fn deep_trailing2(line, color) {
    Trailing2Parent {
        Trailing2 (text(line) bg(color) width(1*))
    }
}
fn deep_trailing1(line2, line1) {
    deep_trailing2!(line1, red) {
        Trailing1 (text(line2) bg(green) width(2*))
    }
}
deep_trailing1!("Second line", "First line") (column bg(beige) rules(1.1*, 2*) margin(20)) {
    Trailing0 (text("Third line") bg(blue))
}
It is equivalent to:
fn sys(cmds: &mut cuicui_dsl::EntityCommands) { cuicui_dsl::dsl!(cmds,
Trailing2Parent(column bg(beige) rules(1.1*, 2*) margin(20)) {
    Trailing2 (text("First line") bg(red) width(1*))
    Trailing1 (text("Second line") bg(green) width(2*))
    Trailing0 (text("Third line") bg(blue))
}
)}
Parameter substitution
Note “argument” here may refer to two things: (1) the value passed as argument to a template, in
template!(foo_bar),foo_baris an argument. (2) arguments passed to methods, inEntity(text(method_argument)),method_argumentis a method argument.The name declared between parenthesis in the
fnname is a parameter. Infn button(button_text),button_textis a template parameter.
When a template is called, the body of the fn is inserted where the call
is made, arguments passed to the template are inlined within the statement
of the template body.
Please pay close attention to how parameters are inlined:
- Parameters are only inlined in method arguments
- Parameters are not inlined within quotes
- Parameters are only inlined if they are the whole argument
| ❗ Compatibility Notice ❗ |
|---|
In the future, parameters will be allowed in more contexts:
|
| To avoid painfull breaking changes, avoid naming parameters the same as DSL methods or templates. |
fn sys(cmds: &mut EntityCommands) { dsl!(cmds,
fn button(button_text) {
    // Will spawn an entity without name, with tooltip set to whatever
    // was passed to `button!`.
    Entity(tooltip(button_text) width(95%) height(200px) bg(purple) row) {
        // Will spawn an entity named "button_text" with text "button_text"
        button_text(text("button_text") rules(0.5*, 0.5*))

        // Current limitation:
        // `gizmo` method will be called with `GizmoBuilder(button_text)` as first
        // argument and whatever was passed to `button!` as second argument
        Gizmo(gizmo(GizmoBuilder(button_text), button_text) rules(0.5*, 0.5*))
    }
}
)}
Tips and tricks
See the dedicated documentation page for all available
configuration options on parse_dsl_impl.
Performance
Consider explicitly depending on the log and tracing crates, and enable the
"release_max_level_debug" features of those crates, so that log messages are
elided from release builds.
cuicui_chirp contains a lot of trace logging in very hot loops.
"release_max_level_debug" will remove trace logging at compile time and
not only make the code faster (code that would otherwise read a lock atomic),
but it enables more optimization, inlining and loop unrolling.
First, find the version of the log and tracing crates in your dependency tree with:
cargo tree -p log -p tracing
Then, add them to your Cargo.toml and enable a max_level feature. Note
that they are already in your dependency tree, so there is no downside to doing so:
log = { version = "<version found with `cargo tree`>", features = ["release_max_level_debug"] }
tracing = { version = "<version found with `cargo tree`>", features = ["release_max_level_debug"] }
# Note: I recommend `release_max_level_warn` instead.
# `debug` is specific for performance regarding `cuicui_chirp`
Next time you compile your game, you’ll probably have to recompile the whole
dependency tree, since tracing and log are usually fairly deep.
Inheritance
Remember the inheritance trick from cuicui_dsl? parse_dsl_impl is
compatible with it. Use the delegate argument to specify the field to which
to delegate methods not found on the MyDsl impl.
// pub struct MyDsl<D = ()> {
//     #[deref]
//     inner: D,
// }
#[parse_dsl_impl(delegate = inner)]
impl<D: DslBundle> MyDsl<D> {
    // ...
}ReflectDsl
Unlike cuicui_dsl, it is possible to use Reflect to define DSLs. See the
ReflectDsl docs for details.
Custom parsers
Since .chirp files are in text format, we need to convert text into method
arguments. parse_dsl_impl parses differently method arguments depending on
their type.
See parse_dsl_impl::type_parsers for details.
What is the relationship between cuicui_dsl and cuicui_chirp?
cuicui_dsl is a macro (dsl!), while cuicui_chirp is a scene file format,
parser and bevy loader. cuicui_chirp builds on top of cuicui_dsl, and has
different features than cuicui_dsl. Here is a feature matrix:
| features | cuicui_dsl | cuicui_chirp |
|---|---|---|
| statements & methods | ✅ | ✅ |
code blocks with in-line rust code | ✅ | |
code calling registered functions | ✅ | |
fn templates | rust | ✅ |
| import from other files | rust | |
| hot-reloading | ✅ | |
| reflection-based methods | ✅ | |
| special syntax for colors, rules | ✅ | |
| lightweight | ✅ | |
Allows for non-Reflect components | ✅ |
You may use cuicui_dsl in combination with cuicui_chirp, both crates fill
different niches.
cuicui_layout
![]()
cuicui_layout is a very primitive layouting algorithm implemented in bevy for bevy.
It is similar to CSS, but without the headache. The philosophy is:
You can always predict how it will look like
cuicui_layout is fully independent from other cuicui crates, you can disable
all default feature and have a bare-bone plugin that only adds layouting components
and systems to your bevy game.
However, cuicui_layout also integrates with cuicui_dsl and cuicui_chirp.
See their respective documentation pages for why you’d want to use them as well.
When to use cuicui_layout?
cuicui_layout is always a better choice over Flexbox, the default bevy UI
layouting algorithm. I’m however not claiming that it is better than other
similar non-flexbox layouting algorithm.
Here is some reasons you’d prefer cuicui_layout over other layouting
algorithms:
- Friendly algo with less things to keep in your head and good defaults.
- Uses and takes full advantage of the bevy ECS.
- Only controls
LayoutRect, notTransform, you need to add a system that setsTransformbased onLayoutRect. - Fully flexible and extensible, can be used with
bevy_ui,bevy_sprite, your own stuff. - Helpful and fully detailed error messages when things are incoherent or broken. As opposed to FlexBox, which goes “this is fine 🔥🐶🔥” and leaves you to guess why things do not turn out as expected.
- This is a single-pass algo, so more efficient than flexbox.
- An extensive debugging overlay.
How to use cuicui_layout?
Cargo features
debug: Enable the debug overlayreflect(default): Enablebevy_reflectimpls for layout components.chirp(default): Enable chirpParseDslimplementation forLayoutDsldsl(default): Define and exportLayoutDslDslBundleimpl for thedsl!macro
Layouting
cuicui_layout exposes the following Components to control layouting:
Node: A layout node, either a container holding other nodes as bevyChildrenor a leaf node.Root: The root of a node hierarchy. You may have several, all computations start from the root.ScreenRoot: If you add this component to aRootentity, it will keep the same size as the camera with theLayoutRootCameracomponent.
See the Rule and Container documentation for detailed explanation.
In short: a Node has independent Rules on the x and y axis. When the
node is a Container, it also has additional properties that manages how
children are distributed within the container.
Those additional properties are:
Flow: The direction in which the children are distributedAlignment: Where on the cross axis are nodes aligned.Distribution: How to distribute the children of this container.margin: How much margin to put on main and cross axis
By default, items are aligned at the center of the container, distributed on the flow direction evenly within the container.
A Rule tells the size of the Node, it can depend on the size of its children,
the size of its parent or be a fixed value.
There isn’t more to it, that’s pretty much all of cuicui_layout.
If this wasn’t clear enough please read the Rule and Container documentation.
Content-sized
It is possible to size leaf nodes based on components present on the same entity.
Use the content_sized traits to do that.
Debugging
cuicui_layout has an integrated debugger. Enable it with the cuicui_layout/debug
cargo feature.
The debugger is an overlay displaying the extent of Nodes and the direction
of their rules.
Why not Flexbox
You are writing text to get 2d visual results on screen.
The translation from text to screen should be trivial, easy to do in your head.
Otherwise you need visual feedback to get what you want.
Bevy, even with hot reloading or bevy-inspector-egui
will always have extremely slow visual feedback.
Flexbox has too many parameters and depends on implicit properties of UI elements, it is not possible to emulate it in your head.
cuicui’s layout, in contrast to Flexbox is easy to fit in your head. In fact, I will forecefully push cuicui’s layout algorithm in your head in two short bullet points.
- A node can be a
Node::Containerand distribute its children along aDirectioneither by evenly spacing them (Distribution::FillMain) or putting them directly one after another (Distribution::Start). - A
Container’s size can be expressed as a static value, a fraction of the size of what contains it, or a multiple of what it contains. - The content of a
Containercan beAlignmentto the start, end or center of its parent (by default it’s centered).
That’s it. There are some edge cases, but cuicui will yell at you
tell you nicely when you hit them and tell you how to handle them properly.
Flexbox FAQ
Q: Where is padding?
A: padding is equivalent to margin in cuicui_layout. margin and border
doesn’t make conceptual sense.
Q: Why not call it padding then?
A: Look at the dictionary definition of “margin” and “padding”.
Q: How do I center a node?
A: nodes are centered by default, make sure the parent’s container size
has the expected size.
Q: What is the equivalent of flex_direction?
A: use row and column
Q: What are the equivalents of column-reverse and row-reverse?
A: None. Use Alignment::End and swap your elements! Note that the *-reverse
flows in flexbox are very useful for internationalization. However,
when making a game, it is not enough to just swap the elements! Artistic control is
paramount and internationalization needs to be taken as a whole in the context of the UI.
Q: What is the equivalent of flex_wrap?
A: None, do you really need it?
Q: What is the equivalent of align_item, align_self, align_content, justify_content?
A: After 5 years of working with CSS, I still have no clue which one does what,
and whether they really do anything, so I won’t adventure an asnwer.
Q: What is the equivalent of flex_grow, flex_shrink, flex_basis, gap?
A: Do you even know what they do?
Q: Why can’t child container overflow their parents?
A: It’s likely you didn’t expect this, so we report it as an error.
Q: How do I make a grid?
A: cuicui_layout is currently not capable of managing a grid of nodes.
This might be added in the future.
cuicui_layout debug view
cuicui_layout has a “debug” mode. It gives a visual representation of container
and node sizes.

Limitations
- While the debug overlay is up, gizmos cannot be used by other plugins
- This is only tested with
cuicui_layout_bevy_uiandcuicui_layout_bevy_sprite(I can’t implement a debug view for your personal custom UI :P) - The debug overlay use the bevy
RenderLayersnº16 and camera order 255 to draw gizmos
How to use the debug view?
Enable the cuicui_layout/debug cargo feature.
cargo run --features cuicui_layout/debug
Debug view mode
There are several view modes, you cycle through them by pressing the space bar:
- nothing (default): There is no additional informations displayed
- outlines: Displays the outline of each
ContainerandNodevisible on screen, with a different color - outlines and rules: In addition to the outline, display each node’s vertical
and horizontal
Rules.- Arrows pointing outwards left and right mean the horizontal size (width) depends on the size of the parent of the node.
- Arrows pointing inwards left and right mean the horizontal size (width) depends on the size of the children of the node.
- The absence of arrows indicate the node has a fixed size.
- Arrows going up and down indicate the rules for the vertical size (height).
Debug view configuration
The debug view can be programmatically manipulated using the Options Resource.
Display invisible layouts
The debug view does not display information about Containers with
a ComputedVisibility component returning vis.is_visible() == false.
Set the Options.show_hidden field to true to display outlines even if the
ComputedVisibility is false.
Change/Remove the cycling key
Maybe your game makes heavy use of the space key (I’ve heard that some plateformers use the space key for a common action, would you belive it?) and you don’t want to cycle through the debug views each time space is pressed.
You can set the Options.input_map value to something else:
#![allow(unused)]
fn main() {
#[cfg(feature = "cuicui_layout/debug")]
fn debug_toggle(mut opts: ResMut<cuicui_layout::debug::Options>) {
  opts.input_map.cycle_debug_flag = KeyCode::X;
}
}
Invert Y axis direction
Confusingly, bevy_ui has a downward Y axis, while bevy_sprite has an upward
Y axis.
You can configure what Y axis direction the debug overlay uses by setting the
Options.screen_space field.
If you are using cuicui_layout_bevy_ui, this should be automatically set to
true for you.
cuicui_layout Content sized nodes
Leaf nodes (nodes that do not contain other nodes) may be “content-sized”.
For example, in cuicui_layout_bevy_ui, a leaf node containing an image may
keep the same aspect ratio as the image.
How to define content-sized elements?
First off, if you are already using cuicui_layout_bevy_ui or
cuicui_layout_bevy_sprite, you don’t need to do anything, those plugins
already take care of elements that should depend on the size of their content.
If you need to implement content-sized elements for your own UI stuff, you will need to:
- Define a
SystemParam(we will refer to it asMyContentSize) - Implement
ComputeContentParamforMyContentSize- In
ComputeContentParam::Components, tell which components are used to tell content size. UseAnyOfif several. - In
ComputeContentParam::condition, tell when the size update system should run
- In
- Implement
ComputeContentSizeforMyContentSize.ComputeContentSize::compute_contentis ran for each leaf nodeEntitywith the provided components.- The sizes infered by the layouting algorithm is passed as the
set_sizeparameter. - The return value is the sizes as they should be, based on the passed
components - Note that the non-content-sized axis will always keep the pre-set size, regardless of the return value.
- The sizes infered by the layouting algorithm is passed as the
- Register
MyContentSizeas a content sized element computation usingapp.add_content_sized::<MyContentSize>().
And that’s it!
The two distinct traits are required due to a limitation in the rust type system. Trying to merge the two traits came close to unleashing Cthulhu into the world. Do not ask me to merge them, do not open an issue for merging them, this way lies madness.
Example
The best examples are the content_sized.rs modules in cuicui_layout_bevy_ui
and cuicui_layout_bevy_sprite.
Please take a look at them to get an idea of the kind of code you need to write.